AWG Blogs

Sunday, December 6, 2009

Resize Root Filesystem (/) with LVM

I made the mistake of accepting the default LVM options during a Debian Lenny installation, only to find out that the root / had filled up quite quickly, having started out with only around 300mb.

I wanted to transfer some free space from /home to /; so did as follows:

Select filesystem (e.g. /dev/mapper/debian-home ... 2.5G) to shrink from Filesystem column in df -h
I chose /home, so must be ssh'd as root; use 'who' command to verify no other users are logged in and have the home dir open.

Resize /home:
#umount /dev/mapper/debian-home
#e2fsck -f /dev/mapper/debian-home
#resize2fs /dev/mapper/debian-home 1G
select the corresponding volume to shrink from lvdisplay, i.e., the LV Name field (e.g. /dev/debian/home)
#lvreduce -L -1.3G /dev/debian/home

Extend root volume (/):
verify there is Free PE in vgdisplay. Check this value against the following lvextend command size option
To extend root volume (/), find it's coresponding name by looking up [LV Name] (e.g.
/dev/debian/root) containing 'root' in lvdisplay
then:
#lvextend -L +1G /dev/debian/root
resize the root file system. Find out the Filesystem name for the / mount by checking df
# resize2fs /dev/mapper/debian-root
check df to verify / is resized.
remount home:
#mount /dev/mapper/debian-home

Warning! This procedure is very risky. A full backup of the system immediately before resizing volumes is strongly advised on production systems. After the volumes are resized, run fsck to fix any errors.


refs:
ref for shrinking: http://www.linuxquestions.org/questions/linux-enterprise-47/shrink-lvm-without-dataloss-557746/
ref for extending /: http://www.linuxquestions.org/questions/linux-general-1/lvm-resizing-the-root-partition-361663/

Friday, November 27, 2009

Vertical List Oriented Columns with XSLT

The general idea is snake your list of items a set number of times down each column. So for a list of 7 items (XML siblings) and "n-rows" being set to 3, the resulting columns will look like this:


item 1item 4item 7
item 2item 5
item 3item 6

The XSLT code:
<xsl:variable name="n-rows" select="3"/>

<xsl:template name="recurse-rows">

<xsl:param name="index" select="1"/>

<xsl:param name="modrow" select="1" />

<tr>

<xsl:for-each select="/root/item[position() mod $n-rows = $modrow]">

<td>

<xsl:value-of select="value" />

</td>

</xsl:for-each>

</tr>

<xsl:if test="$index &lt; $n-rows">

<xsl:call-template name="recurse-rows">

<xsl:with-param name="index" select="$index + 1"/>

<xsl:with-param name="modrow" select="($index + 1) mod $n-rows"/>

</xsl:call-template>

</xsl:if>

</xsl:template>


sources for ideas:
http://www.stylusstudio.com/xsllist/200407/post30810.html
http://www.perlmonks.org/?node_id=518095

Sunday, November 15, 2009

Tips for when Setting up WordPress

Platform: Ubuntu 9.04/Apache 2

To set up WordPress as a virtual directory under a VirtualHost, add an alias to the host file in /etc/apache2/sites-available:

e.g.:
<VirtualHost 172.16.134.5:80>

Alias /blog/ "/usr/share/wordpress/"

ServerAdmin webmaster@localhost
DocumentRoot /home/wordpress/public_html
DirectoryIndex index.php

<Directory "/usr/share/wordpress/">

Options Indexes FollowSymLinks

AllowOverride All

Order allow,deny

Allow from all

</Directory>

...

</VirtualHost>
The guide I used was https://help.ubuntu.com/community/WordPress.

Note: where you run the command "sudo bash /usr/share/doc/wordpress/examples/setup-mysql -n wordpress localhost" you MUST change localhost to the IP or DNS name if you are setting up the site on a remote server. The reason, as I found out the hard way (I use "localhost" at first) is that the script creates a file under /etc/wordpress called config-<hostname>.php. Then when you go to run the web installation routine, the application can't find the config file, unless you set <hostname> in the above command to match exactly the domain used in the URL. This is because the config file is constructed in /etc/wordpress/wp-config.php using $_SERVER['HTTP_HOST'].

Sunday, November 1, 2009

Dell Memory Errors with BIOS USB Support

My 2550 Dell Server was displaying memory errors. It would split the amount of memory available and errors would be produced in the Windows Memory Diagnostic utility starting with the MATS+ test. It also mentioned something about an invalid NVRAM configuration in the startup messages. Dell Diagnostic utility was not helpful. I started disabling all options in the Integrated devices section of the BIOS. I found that by disabling BIOS USB support, the memory errors went away. Go figure!

Saturday, October 17, 2009

Change Directory with String Replacement

Found out through experimentation how to change directories in the bash shell using sed string replacement. I need a quick way to switch from production to staging sites which have the same path but for the user home directory.

First I tried:

echo `pwd` | echo `sed -e 's/production/staging/' ` | cd


That didn't work.

Then I tried:

cd $(echo `pwd` | echo `sed -e 's/production/staging/' ` )


That worked. Go figure...

Sunday, October 4, 2009

Add Hyperlink using jQuery

You can test this out in Firebug. Say you have a td element, <td id="foo" />,
you can add a link to this using jQuery:
jQuery("<a />").attr("href", "http://yahoo.com").appendTo("#foo").text("link to yahoo").after("<br />");

Monday, September 28, 2009

WSS 2.0 to WSS 3.0 Migration

I had a WSS 2.0 site (no custom parts) that I needed to upgrade AND migrate to another server. So I pretty much followed the advice on http://geekswithblogs.net/redwards/archive/2007/10/26/116365.aspx .

The above article is unclear about how the DB was transferred however, so had to wing it. Basically what I ended up doing was copying the .mdf and .ldf files of the WSS 2.0 content DB over to the Data folder of a SQL Express 2005 server --NOT the WSS 3.0 embedded DB (I tried that, but it gave me errors when I ran stsadm).

Note, after the DB was added and all set up in the Central Administration, I had to change the site collection administrator. The migrated site still had the OldServer\Administrator as the Primary site collection administrator. Other than that pretty seamless...

Sunday, September 20, 2009

Getting memcached to Run at Startup on Ubuntu

For some reason memcached would start and then die shortly after on reboot. This is on an Ubuntu 8.04 with updated packages for Apache2, PHP5, and memcached installed through apt-get.

The only way I could fix the problem was to remove memcached from the rc scripts:

update-rc.d -f memcached remove


Then add the following line to /etc/rc.local:

/usr/bin/memcached -d -p 11211 -u nobody -l 127.0.0.1 -m 64


I'm sure this will have to be adjusted if I ever need more memcached processes or if I need the PID file. Speaking of which, I suspect that the canned scripts that came with this memcached 3.0.1 from Ubuntu are too convoluted with regard to the PIDs, which already have problems of their own.

This bug report set me in the right direction.

Monday, August 24, 2009

Eclipse Simpletest plug-in Path errors

I struggled with this one until through experimentation I found out the problem. I have the Simpletest plug-in 0.2.5 for Eclipse.

I had

require_once dirname(__FILE__) . '\MyClass.php';
class test extends UnitTestCase {
function test_pass(){
$tc = new MyClass();
$boolean = $tc->my_method() == "hello";
$this->assertFalse($boolean);
}
}

But when running, I kept getting:

PHP Fatal error: Class 'MyClass' not found in ...test.php...[line number]

I finally found out through trial and error that to fix this fatal error I simply needed to replace the opening short tag with the full php tag <?php . That means I'm going to need to do this to all my class files. Might as well make that a best practice from now on.

Sunday, August 23, 2009

IIS 7 and Permissions Quirks

I just enabled IIS 7 on Windows Vista SP 2 and enable FastCGI. I create a new website and point it to a folder under my Documents folder with a test.php file. I open the page http://localhost/test.php in IE and get:

HTTP Error 401.3 - Unauthorized
You do not have permission to view this directory or page because of the access control list (ACL) configuration or encryption settings for this resource on the Web server.


Ok, so I add IIS_IUSRS to folder ACL, but that doesn't fix it. I then added the Users group to the ACL and that fixes it. Strange indeed because my user account is already in the ACL and I'm in the Administrators group, which is also already in the site folder ACL. Now I just have to wonder whether this is a Windows bug, or whether there's some other user under the Users group that's being impersonated by some process. Hmmmmm.

Sunday, August 9, 2009

Use encodeURIComponent in AJAX

In the XMLHttpRequest "send" method it's best to encode the parameters using the Javascript function encodeURIComponent as opposed to escape or encodeURI. For details why, see
http://xkr.us/articles/javascript/encode-compare/ .

I learned this by researching why the solution at http://www.captain.at/howto-ajax-form-post-request.php did not work for me. For example, if I use escape, the '+' symbol converts to a space in the database; and if I use encodeURI, any '&' will cause all subsequent characters to not make it into the database -- because those characters aren't converted with the other two Javascript methods.

Saturday, August 8, 2009

Hacking CAPTCHA

One way to hack one type of CAPTCHA is as follows:

Assuming the web app sets the captcha code in a session variable and assuming it only checks it for equality, you can use Paros Proxy to trap and alter the captcha url in the image tag (assuming, once again, this is the method used to display the image).

First clear all of the target website's cookies (including session cookies -- still not sure how to do this in IE), then open the target web page form with Paros running with "Trap response" checked in the Trap tab. Then edit or remove the link in the image tag to the captcha image generator, then click Continue. When the page is resolved the captcha image will appear broken, indicating the script that produced it never was run for this session and hence no security session variables were set. Finally, leave the captcha input box empty and submit. If all goes well the form will submit successfully.

The way to protect against this kind of attack is to set another secret session variable in the captcha script then check for it in the form validation.

(this advice is provided to assist newbie web developers with no guarantees. Malicious hackers and script kidies are not welcome.)

Saturday, July 4, 2009

udp_scan on Debian 4

Download & Setup:

lftp -c 'open -e "mget port-scan*" ftp.porcupine.org/pub/security'
tar zxvf port-scan.tar.gz
cd port-scan
make CFLAGS=-D_BSD_SOURCE

There will be some errors.

Then, run udp_scan on target:
./udp_scan 10.10.10.10 1-1024

Note: udp_scan also comes with the SATAN package (and its successors).

Installing SATAN 1.1.1 on Debian 4.0

wget http://www.ibiblio.org/pub/packages/security/Satan-for-Linux/satan-1.1.1.linux.fixed2.tgz

unpack in /tmp and cd to satan-1.1.1

edit reconfig:

sed -i 's/version 5/v\(ersion \)\?5/' reconfig

if no dev environment:

apt-get install make
apt-get install build-essential

then:

perl reconfig
make linux

run:

./satan

Wednesday, July 1, 2009

vtund Experimentation part 3 - Bridging

Picking up from "vtund Experimentation part 2" we are going to set up the bridge interface, which will bridge tap0 and eth1 as depicted in http://blog.kovyrin.net/2006/04/05/connecting-two-remote-local-networks-with-transparent-bridging/ (although there it's eth0).

On both server and client sever the vtund connection (if any) and kill the vtund process.

On the server:
in the lion config of vtund-server.conf, replace
"ifconfig "%% 10.1.0.1 netmask 255.255.255.0";
with the following lines:
ifconfig "%% up";
program "brctl addif br0 %%";
comment out the route command.
change the password (recommended)

On the client:
in the lion config of vtund-client.conf, replace
"ifconfig "%% 10.1.0.2 netmask 255.255.255.0";
with the following lines:
ifconfig "%% up";
program "brctl addif br0 %%";
change the password to same as server's (if changed on server).

On the server:
in /etc/network/interfaces
remove the eth1 ip configuration, except for the line
auto eth1 # to bring up eth1
Add the br0 ip configuration:
iface br0 inet static
address 192.168.100.99
netmask 255.255.255.0
bridge_ports eth1

On the client:
in /etc/network/interfaces
remove the eth1 ip configuration, except for the line
auto eth1 # to bring up eth1
Add the br0 ip configuration:
iface br0 inet static
address 192.168.100.100
netmask 255.255.255.0
bridge_ports eth1

On both server and client bring up br0:
ifup br0

On the server:
vtund -n -s -f /etc/vtund-server.conf

Then on client:
vtund -n -f /etc/vtund-client.conf lion server_public_ip_address

With luck, a UDP connection (tunnel) will be initialized. From client you should be able to ping 192.168.100.99 (server's br0 ip address).

On the server, type
brctl show
results:

bridge name bridge id STP enabled interfaces
br0 xxxxxxxx no eth1
tap0


Now set up another machine on the 192.168.100.x network on either side and ping both machines from it. If the machines can't ping eachother, ensure that the switch (vSwitch if in VMware) is set to Accept in Promiscuous Mode Policy Exceptions.

(see also Building Linux Virtual Private Networks (VPNs) on Google Books for example of the Ethernet Tunnel)

vtund Experimentation part 2

On both client and server:
fresh stable (ubuntu LTS 8.04) Ubuntu, get all updates.
then apt-get install bridge-utils (per http://blog.kovyrin.net/2006/04/05/connecting-two-remote-local-networks-with-transparent-bridging/)
then:
apt-get install uml-utilities
tunctl -u root -t tap0
ifconfig tap0 0.0.0.0 promisc up

then apt-get install vtun

modprobe tun

Then on server, copy /usr/share/doc/vtun/examples/vtund-server.conf to /etc
comment out: bindaddr { iface lo; };
in lion configuration:
change: "compress lzo:9;" to "compress no;"
change: "encrypt yes;" to "encrypt no;"
comment out firewall lines

Then on client, copy /usr/share/doc/vtun/examples/vtund-client.conf to /etc
edit /etc/vtund-client.conf: under the "lion" configuration, change "device tap1" to "device tap0"

Then on server:
edit /etc/network/interfaces:
auto lo
iface lo inet loopback

iface eth0 inet static
address public_ip_address
netmask public_mask
gateway public_gateway
auto eth0

Then on client:
edit /etc/network/interfaces:
auto lo
iface lo inet loopback

iface eth0 inet static
address public_ip_address
netmask public_mask
gateway public_gateway
auto eth0

Then on server:
vtund -n -s -f /etc/vtund-server.conf

Then on client:
vtund -n -f /etc/vtund-client.conf lion server_public_ip_address

With luck, a UDP connection (tunnel) will be initialized. From client you should be able to ping 10.1.0.1 (server's tun0 ip address).

Tuesday, June 30, 2009

Read latest log entries created on Linux

find / -name \*.log\* -mmin -3 -print | xargs tail


This lists all the log entries on the machine in the last three minutes.

Thursday, June 18, 2009

Ubuntu Default Gateway

auto eth0 -- sets eth0 to come up on /etc/init.d/networking restart

tip: put auto eth1 before auto eth0 in /etc/network/interfaces in order to make eth0 the default gateway

Wednesday, June 17, 2009

vtun Experimentation

So I get fresh stable (ubuntu LTS 8.04) Ubuntu, get all updates.
then apt-get install bridge-utils (per http://blog.kovyrin.net/2006/04/05/connecting-two-remote-local-networks-with-transparent-bridging/)
then:
apt-get install uml-utilities
tunctl -u root -t tap0
ifconfig tap0 0.0.0.0 promisc up

then apt-get install vtun

on both client and server:
modprobe tun

then put at end of /etc/network/interfaces (note: create bridge dynamically through vtun program commands instead?):
auto br0
iface br0 inet static
address 192.168.1.200 (199 for server)
netmask 255.255.255.0
bridge_ports eth0

then ifup br0

on client /etc/vtund.conf

options {
port 5000;
timeout 60;

# Path to various programs
ifconfig /sbin/ifconfig;
route /sbin/route;
firewall /sbin/iptables;
}

IP-Tunnel {
passwd abcd1234; # Password
type ether; # Ethernet tunnel
device tun0;
up {
# Connection is Up
ifconfig "%% up";
program "brctl addif br0 %%";
};
down {
# Connection is Down
ifconfig "%% down";
};
}


On server /etc/vtund.conf:
options {
# type stand;
# stand(default), inet (used only at server)
port 5000;
# Server will listen on this port for incoming requests.
syslog daemon;
# Syslog facility

# Path to various programs
ppp /usr/sbin/pppd; #Path to the pppd. Use "which pppd" to find this.
ifconfig /sbin/ifconfig;
route /sbin/route;
firewall /sbin/iptables;
ip /sbin/ip;
}
# Default session options
default {
type ether;
#tun, ether, tty(default), pipe (Used only at Server)
proto udp;
#udp, tcp(default) (Used only at server)
# device tun0;
compress no;
# no, yes, zlib:(1-9), lzo:(1-9); e.g. zlib:1 (default) (Used only at server)
encrypt no;
#yes, no (used only at server)
stat yes;
#yes, no: check /var/log/vtund/SessionName_X
speed 0;
#By default maximum speed, NO shaping (Used only at server)
keepalive yes;
#Used to keep alive the connection. (Used only at server)
}
# TUN example. Session 'cobra'.
IP-Tunnel {
passwd abcd1234; # Password
type ether; # IP tunnel
proto udp; # UDP protocol
device tap0;
compress no; # lzo:9; # LZO compression level 9
encrypt no; # Encryption
keepalive yes; # Keep connection alive
stat yes; #yes, no

up {
# Connection is Up
# 10.3.0.1 - local, 10.3.0.2 - remote
# ifconfig "%% 192.168.254.201 pointopoint 192.168.254.200 mtu 1450";
# route "add -net 192.168.0.0 netmask 255.255.255.0 gw 192.168.254.200";
ifconfig "%% up";
program "brctl addif br0 %%";
};
down {
# Connection is down
# 10.3.0.1 - local, 10.3.0.2 - remote
ifconfig "%% down";
# route "del -net 192.168.0.0 netmask 255.255.255.0 gw 192.168.254.200";
};

}

then on server, vtund -s (change port to 5000?)

then on client: vtund IP-Tunnel 172.16.2.16 (real of IP of server).

other references:
recompile kernel http://www.howtogeek.com/howto/ubuntu/how-to-customize-your-ubuntu-kernel/

check Universal Tun/tap device driver support under Device Drivers > Network device support

try tunctl to create tap, e.g. http://www.mail-archive.com/vtun-users@lists.sourceforge.net/msg00001.html

try steps here: http://adamolson.com/articles/UnixReview.com%20%20Secure%20Tunneling%20between%20Intranets%20with%20VTun%202000.htm
or here: http://www.opennet.ru/soft/vpn_table/vtund1.html

read http://vtun.sourceforge.net/setup.html

tips for manual setup: http://www.blindhog.net/linux-bridging-for-gns3-lan-communications/

and http://www.linux.com/archive/articles/54894 vtun tutorial

bridging in Linux: http://www.linuxfoundation.org/en/Net:Bridge

http://dkprojects.wordpress.com/transparent-ethernet-bridge/ - transparent bridge (hub)

Sunday, March 22, 2009

TortoiseSVN - Quick Start

TortoiseSVN repository set up:

-Install TortoiseSVN
-Perform these steps in Windows Explorer:
-right click in new empty dir (named after your project) and
choose ToroiseSVN > create repository here. This will be your repository, so make note of its location.
-Then rightclick your project folder and click TortoisSVN > Import, Browse to the path to your newly created repository and hit ok. Alternatively, enter a path like file:///SVNRepos/MyProject
-Rename your project folder by appending ".bak" or anything
-Create a new empty folder next to your old folder having the same original name of the project folder
-Open the new empty project folder and right click in the empty folder and choose SVN Checkout...
-Make sure the path to your newly crated repository is under "URL of repository:" and hit OK

Now you have a version controlled project!

Saturday, March 7, 2009

Thoughts on Ruby on Rails

Was doing some research on the pros and cons of ROR and came across this article. A snippet:

Rails is designed from the ground up to create dynamic Web sites that use a relational database backend. It adds key words to the Ruby programming language that make Web applications easier to configure. In addition, it's designed to automatically generate a complete, if somewhat crude, Web application from an existing database schema. The latter is both Ruby's greatest strength and its Achilles' heel. Rails makes assumptions about database schema naming conventions that, if followed, make generating a basic Web site a matter of executing single command. But to do this may require additional configurations or in some cases may not be possible at all. You're also likely to find that just about every database convention that Rails expects can be overridden, but the more overriding that is needed, the less productive the platform becomes.

I knew this instinctively long ago when I did research debating whether to use an existing content management system (CMS) or create one from scratch. At that time, I was visiting blogs where followers of the ROR cult would rave about ROR and attack anyone that pointed out its flaws. There was this one guy in particularly that kept pointing to the database, and noting that the database design is too restrictive. He argued in favor of his own CMS, RADICORE, from which I got the idea to incorporate XSLT into my new CMS.

My opinion is that ROR is too tightly coupled to the database. The database design dictates the application. In that sense, it's a two-tiered application. I know next to nothing about ROR, but I've got friends and associates who work with it for a living. But I can't for the life of me understand the attraction of a platform that doesn't have a robust middle layer! Is there any concept of business objects in ROR?

Another article was linked to from the above article which lays out the restrictions and implications of a rails application:

Conventions that relate to legacy schema integration with Oracle and Rails include the following:
Tables are named in using the plural form of the model they represent. For example, an "employee" model maps to an "employees" table.
All tables that contain data that will be updated contain a primary key called "id."
In the case of Oracle Database, this primary key is incremented using a sequence with a name based on the table it increments. A table named "employees" that contains an "id" will be incremented by a sequence named "employee_seq."


Apart from the unappealingness of the restictions of how one must name the tables, I find something else more disquieting. The unspoken assumption in the Rails architecture is that tables map to entities in the traditional sense, i.e. that they reflect entities that appear perhaps in the real world and directly against which the application will perform its actions.

This makes integration of rails with one of my CMS's impossible, since the tables in my "MyEntityDB" framework are really meta-tables.

Then there's all those files in the "layouts" folder. That's another unspoken assumption that the design will reside in files. That makes another one of my CMS's impossible to work with Rails, because the design parts happen to reside in database table fields.

It also appears to be a cryptic version of Smarty.
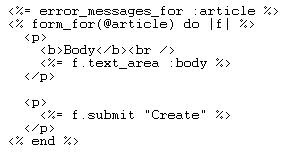
Here's some sample ROR code from a downloadable app from here:

The embedded variables indicate a strong reliance on the application environment, which also I find disquieting. I prefer pure XSLT for the view layer, since it depends on XML for its data. That's what I use in my MyEntityDB framework, because it enforced complete separation between code and presentation (not just token separation as in Smarty Templates).


Saturday, February 21, 2009

Volts, Amps, and Watts, Oh my!

http://en.wikipedia.org/wiki/Volt

Had to read it twice before I realized that a Volt represents the potential power, while Amps represents the actual power. "Watts" represent the actual power as well, but it's the total power arrived at by multiplying amps by volts.

Another realization I had when researching power consumption constraints for a possible home data center was that the "watts" specification on the side of appliances is actually the measure of watts per hour (DUH!). So if the space heater is 1500 watts, that means it's using 1500 watts (1.5 kW) per hour (if it's turned on and set to High).

More notes:
Helpful discussion here.